Setting up a WebDAV Server on IGEL OS
In my test environment, the WebDAV server is physically far from my IGEL clients. Exporting images from IGEL to WebDAV can take hours, so I wanted a faster way to test the IMH Exporter experience without waiting for long uploads. To test what the IGEL Managed Hypervisor (IMH) Exporter looks like without needing to wait for the uploads to complete, I set up WebDAV right on my IGEL client.
In this post, I'll outline the steps I took to set this up.
This setup is almost certainly unsupported by IGEL. This was a "for fun" project that might help you if you ever need to export a VM without having a WebDAV server available. As with all things, run this in your test environment and don't muck around on your production systems.
For my setup, I used an external USB key with enough storage to house the VMs. If you have a partition large enough on your client, you could easily use that instead, just adjust the paths appropriately.
- Found the address of my attached USB key by running:
1# List block devices, then limit to just those with "sd" in the name.
2lsblk | grep sd
3
4# My results - your results may vary.
5# sda (disk)
6# |- sda1 (part)
- Knowing my USB partition was
/dev/sda1, I mounted it and got it ready.
 1# Make folder to mount to
 2mkdir /media/usb
 3
 4# Mount block device to new folder
 5mount /dev/sda1 /media/usb
 6
 7# Change to the new usb directory
 8cd /media/usb
 9
10# Create a folder for my IMH goodies.
11mkdir IMH
- Next, I move into the new IMH folder and download a portable WebDAV server from GitHub.
 1# Move into IMH folder
 2cd IMH
 3
 4# Download Henrique Dias' portable WebDAV Server
 5# If this starts 404-ing in the future, head over to the following URL and get the link for the latest linux-amd64 build:
 6# https://github.com/hacdias/webdav/releases
 7wget https://github.com/hacdias/webdav/releases/latest/download/linux-amd64-webdav.tar.gz
 8
 9# Extract the tarball to the current folder
10tar -xvf linux-amd64-webdav.tar.gz # Ignore any errors about file ownership if you get them.
11
12# Make sure the WebDAV file downloaded
13ls -l # Check for the 'webdav' file here.
- Create a simple config file for the WebDAV server:
1# Create a new config file for WebDAV
2nano config.yaml
This opens the config.yaml file. Here’s a basic example you can paste in and then modify as needed.
 1address: 0.0.0.0
 2port: 8080
 3
 4tls: false
 5prefix: /
 6debug: true
 7noSniff: false
 8behindProxy: false
 9
10directory: /media/usb/IMH   # Change this if you're setting this up somewhere else.
11permissions: CRUD
12
13rules: []
14rulesBehavior: overwrite
15
16log:
17  format: console
18  colors: true
19  outputs:
20  - stderr
21
22cors:
23  enabled: false
24
25# This is fine for a quick test, but see https://github.com/hacdias/webdav for
26# more information on encrypting passwords or using environment variables.
27users:
28  - username: admin
29    password: admin
Press CTRL+X to close nano and then Y to save.
- Start the WebDAV Server:
1# Start WebDAV
2./webdav
If this works, you should see a message indicating that the server is LISTENING. You can do a quick test of the server with cURL (in another terminal window):
1# Should prompt for password (see config.yaml above) and then format the XML results.
2# You should expect to see one XML leaf response for every file in the folder.
3curl -u admin http://127.0.0.1:8080/ | xmllint --format -
4
5# If this doesn't look right, run just this and look for errors to troubleshoot:
6curl -u admin http://127.0.0.1:8080/
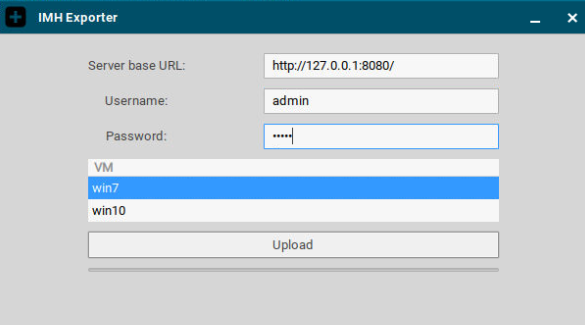
Lastly, you can now use this address to upload VMs to your USB via WebDAV.
Note that this drive will likely not mount again after a reboot, so you'll want to re-follow parts of steps #1 and #2 to mount the USB stick again if you want to continue testing. Since the webdav binary and config.yaml files are on your stick, you won't need to download or recreate those, just start the server back up again using the commands in step #5.