Set up IGEL with Zscaler Root Certificate Authority
In a previous post outlining how to set up IGEL for the first time, I mentioned that if you're using a technology that swaps out the SSL/TLS certificate on your network (the most popular solution being Zscaler), you'll run into problems getting a demo license. This will cause to several other issues down the line - this is just the first.
In this post I will walk you through installing your Root CA certificate during the build process of your IGEL client. I'm assuming your other clients are Windows and including steps on obtaining the certificate from Windows. There are methods to get it from a Mac, but I'm not familiar with those steps so I'm not including them here. You can also get the certificate from your Zscaler administrators.
Also, these same steps will likely work for any other SSL inspection technology, but since I'm most familiar with Zscaler, that's what we're testing here today.
On your Windows PC
On your company PC (where the Root CA has already been deployed by your administrators), launch CertLM.msc from the Start Menu. Once launched, expand Trusted Root Certificate Authorities and then select Certificates. Find the certificate that matches the name of your SSL inspection technology. For Zscaler, it's Zscaler Root CA.

- Right-click on the certificate and select All Tasks followed by Export.
- Click Next on the welcome screen.
- Select Base-64 Encoded X.509 (.CER) for your certificate type. Click Next.
- Provide a file name that you'll remember in a few minutes.
- Complete the wizard.
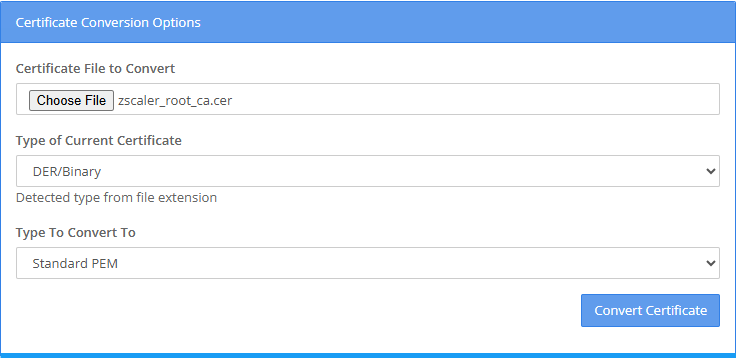
The exported file is in a binary format, but IGEL (Debian) requires a plain-text PEM format. We'll need to convert it first The easiest method is to use an online tool such as the SSLShopper SSL Converter. To use this tool, simply choose the exported file, select DER/Binary for the certificate type, and then Standard PEM for the type to convert to.
You could also use OpenSSL for this process and there are several instructions online you can follow if you'd prefer not to use the SSLShopper service.
At this stage, you can delete the originally exported file. We will only use the plaintext PEM file from this point forward. If you're confused about which is which, open them with a text editor. The one that begins with -----BEGIN CERTIFICATE----- is the correct file.
On the IGEL Client
Introduction Steps
If you're unable to attach to the UMS because of certificate issues. If you're already attached successfully to a UMS, you can follow the steps in Deploying Trusted Root Certificates in IGEL OS from the official documentation. These steps, however, will help you if you're trying to get your demo license, or if you can't connect to your UMS because of Zscaler (or other TLS inspection) issues.
If your building your system now, you'll want to follow the previous post all the way through until you get to the section IGEL First Boot. You'll want to stop at the screen that says "Is this the right display and keyboard language?" If this is for an existing build and you're already at the desktop, you can just launch a new terminal window and authenticate as 'root'.
Your next decision is how you're going to get the certificate file on to the device. Below I'll offer a few suggestions.
Don't have anywhere to host the certificate to make it accessible to your IGEL PC? Use Pastebin. Public keys for Root CA are typically not sensitive (check with your internal security teams as necessary), and your uploaded key can be downloaded in raw format from IGEL using the URL https://pastebin.com/raw/pastebin_unique_id.
The unique ids are also typically very short making them easy to retype.
Method 1: Copy the file using a USB Key (Physical Hardware Only)
- Copy the file to a formatted USB key.
- Attach the USB Key to the system and reboot it.
- Once you're at the welcome screen again, press CTRL+ALT+F11 to open a terminal window.
- Press ENTER on your keyboard to login.
- Navigate to your media folder by typing
cd /userhome/mediaand pressing enter. - Enter
ls -lto find the name of the directory assigned for your USB key. - Enter
cd directory(where directory is the folder from Step 6) to navigate to the USB key. - Enter
ls -lagain and verify the certificate file is there. - Enter
cat zscaler_root.cer(replaced with correct filename) to verify the certificate looks correctWhat am I doing?Some of these commands will be familiar to those coming from Windows, but I'll describe them below.
Command Windows Command Line PowerShell Comments ls dir Get-ChildItem The -l param puts the output in a list cd cd Set-Path cat type Get-Content
Once the certificate file is there, you can skip the other options below and go to Installing the Certificate.
Method 2: Download the file from a webserver (internal or external)
In the following steps, replace the URLs and output file names as appropriate.
- Host the file on a webserver that's accessible to your IGEL client.
- From the welcome screen, press CTRL+ALT+F11 to open a terminal window.
- Enter
curl --insecure https://pastebin.com/raw/unique_key --output zscaler_root.cer - Enter
cat zscaler_root.cer(replaced with correct filename) to verify the certificate looks correctWhat am I doing?Some of these commands will be familiar to those coming from Windows, but I'll describe them below.
Command Windows Command Line PowerShell Comments curl N/A Invoke-WebRequest The insecure flag ignores SSL errors. cat type Get-Content
Installing the Certificate
Regardless of which method you chose, you're now in a terminal and in a folder that contains the certificate file, which for this demo we'll call zscaler_root.cer. You've also confirmed the certificate is correct by seeing the content of it and hopefully noticed that it begins with a BEGIN CERT line and ends with an END CERT line.
- Enter
mkdir /wfs/ca-certsto create a local certificate directory. - Enter
cp zscaler_root.cer /wfs/ca-certsto copy the cert to the new directory. - Enter
cd /wfs/ca-certsto navigate to the new local certificate directory. - Enter
ls -land verify the certificate is there. - Enter
rebootto reboot the PC.
The final reboot isn't mentioned in IGEL's official documentation, but in practice it seems to be required during first-time setup. d
Some of these commands will be familiar to those coming from Windows, but I'll describe them below.
| Command | Windows Command Line | PowerShell | Comments |
|---|---|---|---|
| mkdir | md | New-Item | |
| cp | copy | Copy-Item | |
| cd | cd | Set-Path | |
| ls | dir | Get-ChildItem | The -l param puts the output in a list |
| reboot | shutdown | restart-computer |
That's all there is to it. The Zscaler Root CA is now trusted by IGEL!