Standing up a Microsoft Certificate Authority - Part 1
In this post I'm going to walk through the steps necessary to standup a pretty basic Certificate Authority (CA) within your on-premises Active Directory environment. This is an introduction to CA only, and I'll admit that all of my knowledge is from working with consultants to stand environments up and from reading Microsoft's documentation. Make sure you do your own research to properly secure your CA and stand it up in a way that works best for your environment.
Update 2021-03-09:
Minor updates to grammar, spelling, and a bad image on a few pages of this series. Thanks Adam Cook and Nick Skwarek for your contributions!!!
This post is one in a series about setting up a Microsoft Certificate Authority. It's broken down into the following parts.
- Part 1 - Standing up your Root CA (You Are Here)
- Part 2 - Standing up your Subordinate/Issuing CA
- Part 3 - Catch up on what we've done and how it works
- Part 4 - Trusting your Root CA across the domain
- Part 5 - Setting up Certificate Templates
- Part 6 - Using Computer, Web Server, and Code Signing Certificates
- Part 7 - Using the Certificate Enrollment Web Interface
- Part 8 - Maintenance and your day to day work
- Part 9 - So you want to learn more?
I'd like to acknowledge two people for their contribution to my knowledge on PKI and to this post. The first is Jason Sandys, who first taught me the basics both as a presenter and as a consultant, and also Anthony Fontanez, who I've had numerous conversations about PKI and Certificates with, who was a huge technical editor for this post, and without whom this series of posts wouldn't be nearly as good as I hope you'll find they are.
I'd also like to call out that almost everything in this series of posts is automatable and can be done with a combination of PowerShell and the CERTUTIL tool that's included with most builds of Windows. But, in my opinion, automation is for things we'll do repeatedly, and standing up a Certificate Authority is probably something you'll do once in any given organization.
What exactly is a Certificate Authority?
Let's start with a basic understanding of Certificate Authorities. You can skip this part if you're not interested, but personally I find it easier to wrap my head around things when I understand them better. The biggest concept to understand with a CA environment is chains of trust. Essentially, you trust the identity of someone because they have proof that someone else you trust has vouched for them.
Put into non-technical terms, let's say that you trust the American government. You don't trust them because anyone above them does, you just inherently trust them - you always have. This makes the American Government your "Root Certificate Authority". If the American Government says that the US Passport Authority is trustworthy to properly identify people, then because you trust the US Government, you now trust the Passport Authority to hand out IDs to people. The Passport Authority is now your Issuing CA, a "subordinate" of the Root CA. This is the first step in the chain. Finally, if someone shows you an ID that has been issued by the US Passport Authority, you trust that they are who they say they are.
The US Government may not be the only one you trust. In fact, you probably trust a few different governments. If you could trace back a passport from someone in Japan to a valid root authority, you might trust them as well. And the UK, and Germany, and Mexico, and so on. If someone were to hand you a piece of paper that says "I am Kaylee Frye because I say I am", you may or may not trust them. This is a self-signed certificate, and we see them often in enterprises that don't stand up their own Certificate Authorities.
Certificates not only identify people, however, it also tells you what you can trust them for. If you trust the US Government, and the US Government Trusts the Passport Authority, and the Passport Authority issues an ID to River Tam, this means that you trust that River is who she says she is - but this doesn't inherently mean that River can start handing out her own IDs, because neither the US Passport Authority nor the US Government says she can - only that she can use it to identify herself.
The image below is my attempt to show a graphical representation of how a Certificate Authority works compared to one you might be more familiar with, such as your government.
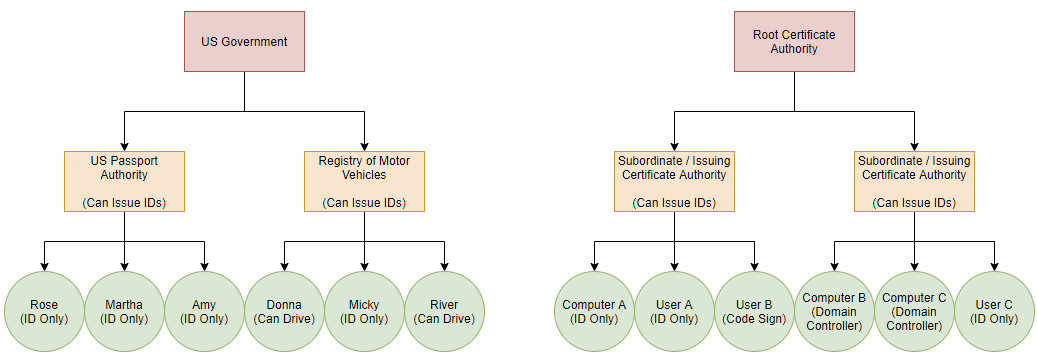
When you check on Amy's ID (certificate), you can see it was issued by the US Passport Authority. You may trust that authority already (because they're already in your Certificate Store as trusted), or you may trust them because you trust the US Government at the root. If someone were to come to you with an ID from Wakanda, and you don't already trust Wakanda as a Root Authority, you need to decide if you'll start trusting them, or if you won't.
With the basics out of the way, it's time to stand up the environment.
What are we doing here?
In this first post, we'll stand up your Root Certificate Authority, which will be completely offline and never touch a network, or more importantly, the Internet.
The Root CA kept offline because it is the ultimate trust for your organization; if it were to be compromised, it could be used to standup addition certificate authorities called "Intermediate Certificate Authorities" that would be trusted automatically by your entire fleet. I'm not too concerned in my lab and will be keeping everything on my laptop, but in production the hardware or disk used by your Root Certificate Authority should be locked up tight.
In this lab, we'll be building our environment completely in Hyper-V because it's easier than having a bunch of hardware kicking around. There may be an argument that having an Offline VM running on a Hyper-V server that is network connected isn't truly secure, but that's between you and your InfoSec team. It's certainly more than fine for a lab.
Pre-Existing Environment
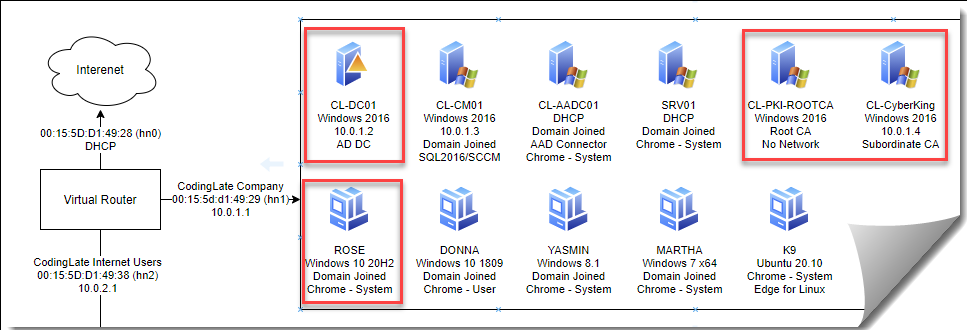
Before moving forward, I've setup my lab environment with a Domain Controller running Windows Server 2016 and multiple Windows 10 clients. I have access to an Enterprise Administrator account. All of the clients on the virtual network are able to communicate with one another and all Windows 10 clients are domain joined. The below image is a graphical representation of the lab we'll be using, with the systems we'll configure in this blog series outlined in red.
The Root CA Server Hardware & Operating System
Performance wise, not much is required for your Root CA. It won't be used by actual users and doesn't have to run any software, it will just require some components to be installed from the Windows Server CD. For this demo, I'm setting up my server I outline below. If you can't devote these resources in your lab, running with a single Virtual CPU and 4 GB of RAM will work fine, it may just be slower.
- Windows Server 2016 Standard
- Hyper-V Generation 2
- 2 Virtual Processors
- 8,096 MB of RAM
- 30 GB Virtual Disk (Single Disk)
- Network Adapter Removed from VM
During the setup of Windows Server 2016, I'm going to include the Desktop Experience when prompted. Keep your administrator password somewhere safe, you don't want to lose access to your Root CA. I also took an opportunity at this stage to rename the computer, although that's mostly pointless since it's never online, however once the CA is configured, it cannot be renamed.
In addition to just installing the Operating System, the following are some best practices I've picked up along the way for your Root CA. Most of these are about reducing the attack surface on your Root CA. None of these are really necessary in a lab environment, but should be considered when standing up a production instance of a Certificate Authority.
- Install the latest Servicing Stack Updates and Cumulative Updates
- Remove SMBv1, PowerShell v2, .NET 3.5, which are often built into older Server Operating Systems
- Enable the Windows Screen Saver and set the timeout to 60 seconds
- Set the server time zone properly and ensure the time is correct
Installing the Certificate Authority Feature
Everything you need to setup your CA is included on the CD/ISO for Windows Server or is baked into the Operating System. To install the Certificate Authority Feature, you'll:
- Launch Server Manager
- Select Manage and then Add Roles and Features
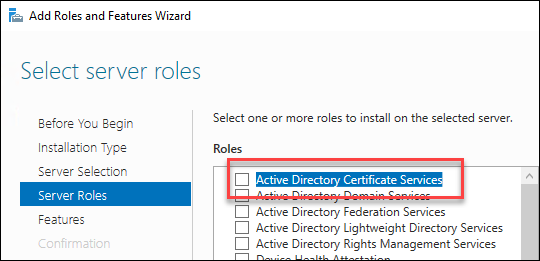
- Follow the Wizard until you reach "Server Roles"
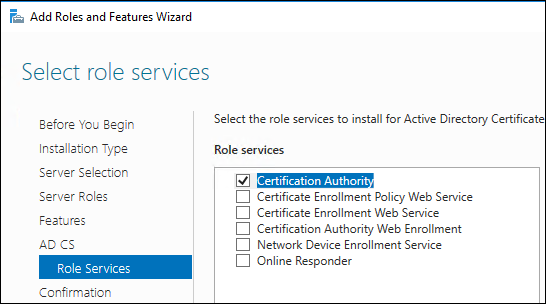
- Enable "Active Directory Certificate Services" and continue the wizard
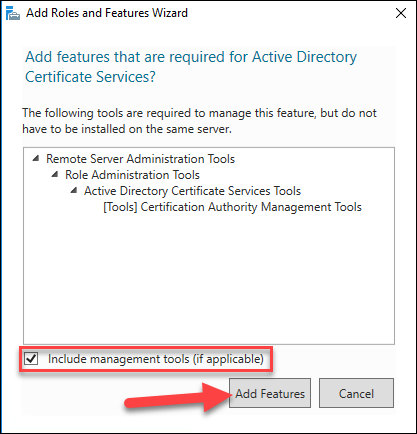
- Select to add the additional management features if prompted and continue the wizard
- Do not add any additional features or role services when prompted (only Certificate Authority)
- Complete the wizard and wait until it's completed the installation before continuing
Configuring the Certificate Authority
Once the installation completes, you should get a warning flag in Server Manager for AD CS Configuration.

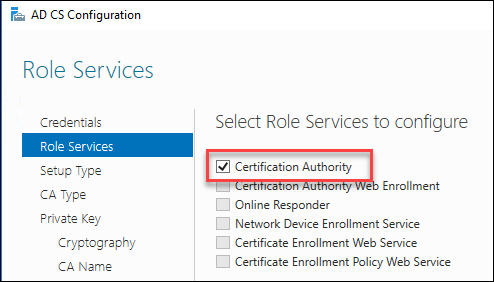
Select that flag and then click the "Configure Active Directory Certificate Services on the Destination Server" link. Complete this wizard as follows:
- Enter your local administrator credentials
- Check to configure just "Certificate Authority"
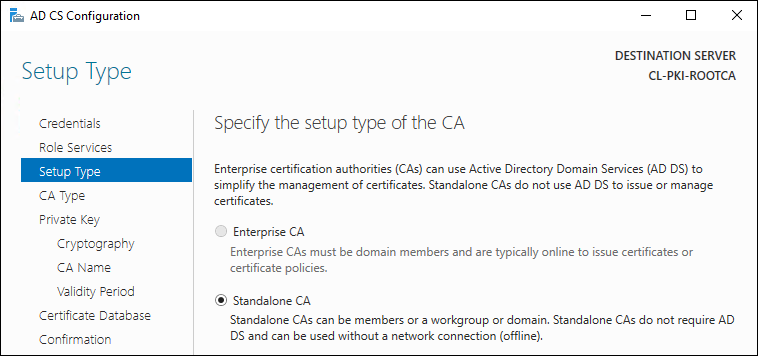
- Select Standalone CA and select Next (we'll configure your AD CS later)
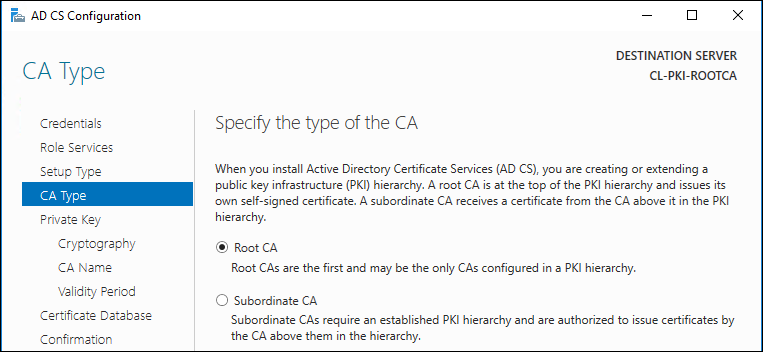
- Select Root CA
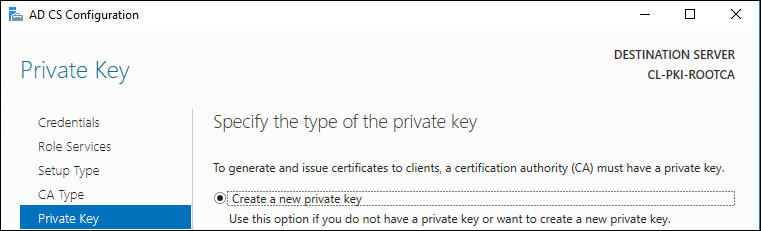
- Select to create a new Private Key
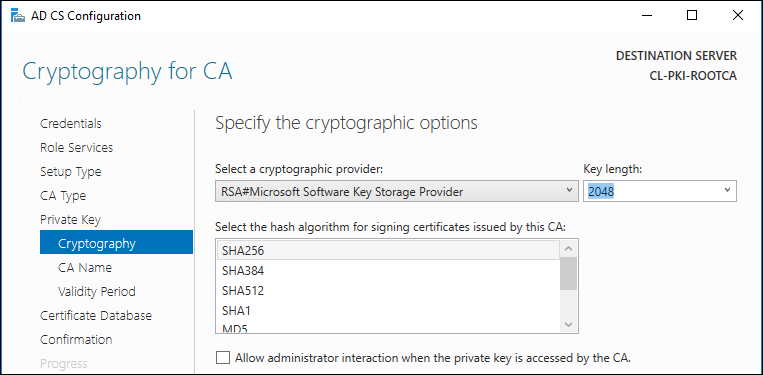
- Select your cryptography options (see Microsoft doc for more information). If your lab environment, it doesn't make a lot of difference what you select and the defaults are OK. In a production environment, you should read about the different technologies to make the best decision for your organization.
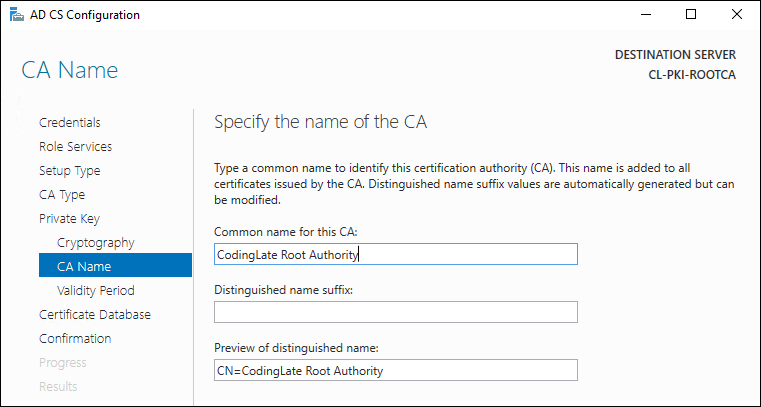
- Define your CA Name; for production, see the docs. The common name will default to the hostname of the Root CA, but there is no requirement to keep this value. For my lab, I'll change mine to something that makes sense for me.
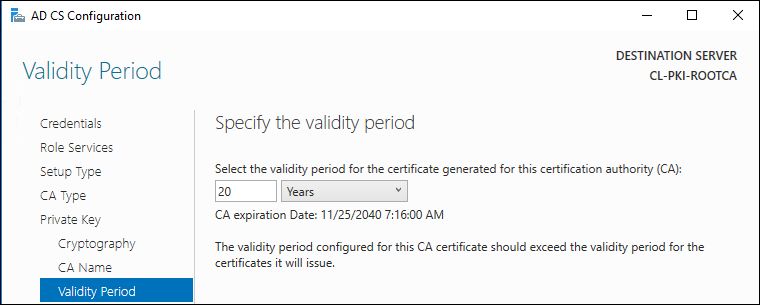
- Set your certificate validity period, for the lab I'll use 20 years (see the note below this list for more information on this)
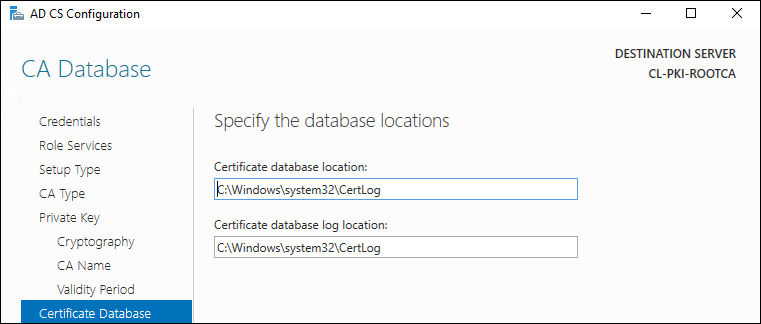
- Leave the database location as-is unless you have a specific need to change it
- On the final screen of the wizard, click Configure to complete and wait until you receive the Configuration Succeeded Message, at which point you can click Close
Something important to note about the validity period is that a CA cannot issue certificates that expire beyond their validity period, so most articles will have you start the renewal of the CA at about the half way point so that you never run into problems issuing new certificates. Anecdotally, I've heard of many enterprises using 10, 15, or even 20 years on their Root CA.
Congratulations, you now have a Root Certificate Authority!
Defining the Certificate Revocation List (CRL) and Authority Information Access (AIA) Paths
Finally, we need to configure the CRL for this CA so that clients can find it. The CRL is a list of certificates that have been revoked by this authority. Revocation is different than an expiration; when a certificate has been revoked, someone is typically saying that it's either no longer in use, or that it has been compromised. Some services will ignore a missing CRL, while many others will not consider a certificate valid if it cannot find an updated CRL.
Because the server will be offline, we'll keep the CRL elsewhere. For the lab, we're going to keep it on the Intermediate Certificate Authority, which we'll create in the next part. You can keep yours anywhere that your users can access it. To make life easier in the long run, you may want to consider a DNS alias that you can repoint as needed when server names change.
To configure the path to your CRL, follow these steps.
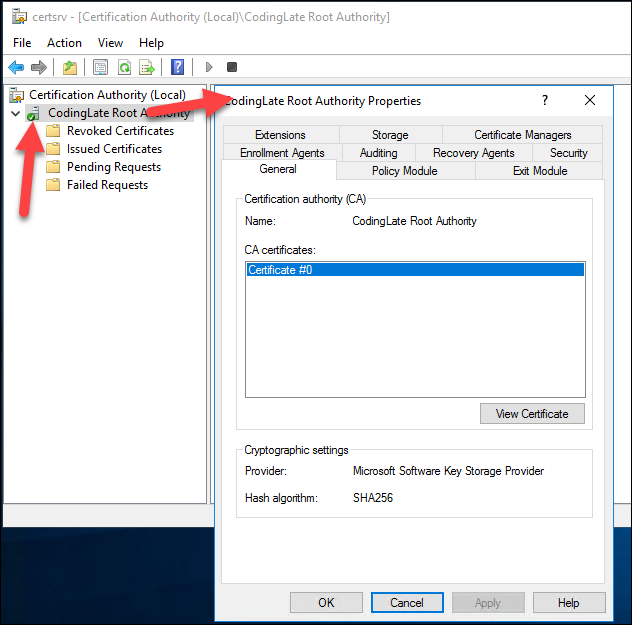
- Launch Certificate Authority from your Start Menu
- Right click on the CA name and select properties. A window like the one shown will appear.
- Navigate to the Extensions tab and ensure that CDP is selected as the extension to configure.
Notice there are four default locations to store the CRL. If you select each of them, the options at the bottom will change to show which the CA will publish to, and which will be included in the certificate versus ones that are published to Active Directory or copied to a file system. Since this server will be completely offline, the only place it can store the CRL is locally.We will still need to define a path in the certificate so that clients can find it. You'll want to ensure that the file does save to the CertEnroll folder (the top one) so that you have a place to copy it from.
For our lab, we'll also define a web path for our clients to follow. I'll be calling my intermediate CA "CL-CyberKing", so that is what we'll use here. Here is my final configuration:
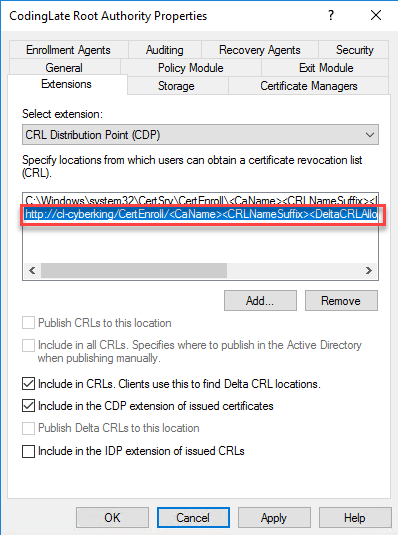
The full URL (as it's cut off in the image), is http://cl-cyberking/CertEnroll/<CaName><CRLNameSuffix><DeltaCRLAllowed>.crl. Ensure that you have the option Include in the CDP extension of issued certificates checked or you're going to run into issues in the next step.
Later, we'll setup that path on the Intermedia Server.
- Next, we'll configure the AIA by selecting that extension from the drop down. Here, we'll define where clients can get the CRT (certificate) for this CA. Since, again, the Root CA will be offline and not reachable, we'll use the webserver that will be running on the Intermediate Certificate Server. Here is my final configuration for the lab:
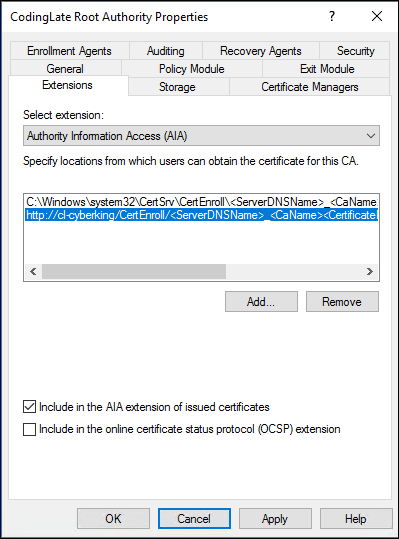
The full URL I've included here is http://cl-cyberking/CertEnroll/<ServerDNSName>_<CaName><CertificateName>.crt. I've also checked to include the path in the issued certificates.
- Lastly, click the OK button to save your work, and restart the services when prompted.
Two things I'd like to note here before we finish up. First, in a production environment you may decide that your clients need to reach your CRL when not on your network. Remember, it's possible that in some scenarios a system or application may not consider a certificate valid if it cannot check the CRL. If this is the case, ensure that you've included a location in the list that's accessible when not connected to your network.
Second, we're using HTTP and not HTTPS. This is because if we were to use HTTPS, we'd likely end up using this CA to create the SSL certificate. If we needed to validate the SSL certificate for the site using the CRL, but we couldn't consider the cert of the site hosting the CRL valid without checking the CRL, we'd end up in a loop where the certificate may not be considered valid.
That's it, you're done! Next up, we'll create our Intermediate Certificate Authority.
Next: Part 2 - Standing up your Subordinate/Issuing CA
No comments