Standing Up a Microsoft Certificate Authority - Part 2
This post is one in a series about setting up a Microsoft Certificate Authority. It's broken down into the following parts.
- Part 1 - Standing up your Root CA
- Part 2 - Standing up your Subordinate/Issuing CA (You Are Here)
- Part 3 - Catch up on what we've done and how it works
- Part 4 - Trusting your Root CA across the domain
- Part 5 - Setting up Certificate Templates
- Part 6 - Using Computer, Web Server, and Code Signing Certificates
- Part 7 - Using the Certificate Enrollment Web Interface
- Part 8 - Maintenance and your day to day work
- Part 9 - So you want to learn more?
This is an introduction to CAs only, and I’ll admit that all of my knowledge is from working with consultants to stand environments up and from reading Microsoft’s documentation. Make sure you do your own research to properly secure your CA and stand it up in a way that works best for your environment. A personal shout out again to my technical editor for this series, Anthony Fontanez.
In this post, we'll stand up a subordinate Certificate Authority server. This will be your domain joined, always online server that will actually hand out the certificates to clients. This server is often referred to by three names that we'll use a bit interchangeably here:
- Subordinate Certificate Authority
- Intermediate Certificate Authority
- Issuing Certificate Authority
Update 2021-03-10:
With the help of Nick Skwarek, we've updated this post to outline how to handle the error CRYPT_E_NO_REVOCATION_CHECK.
Pre-Existing Environment
As I noted in my last post, I've setup my lab environment with a Domain Controller running Windows Server 2016 and multiple Windows 10 clients. I have access to the Domain Administrator account. All of the clients on the virtual network are able to communicate with one another and all Windows 10 clients are domain joined. Additionally, I now have a Root CA setup from the previous article.
The Subordinate CA Server Hardware & Operating System
I'll want to give the subordinate CA a bit more in terms of performance than my Root CA server. This will be the server that my workstations and users connect to for certificate requests, and we'll also be running IIS on it. For the lab, we're OK to keep it light.
- Windows Server 2016 Standard
- Hyper-V Generation 2
- 2 Virtual Processors
- 8,096 MB of RAM
- 30 GB Virtual Disk (Single Disk)
During the setup of Windows Server 2016, I'm going to include the Desktop Experience when prompted. Once the server is online, you'll need to update the hostname and join the domain as once the CA is configured, it cannot be renamed nor can the domain be changed.
Like the Root CA, if someone were to gain access to a this server, they would have the keys to the kingdom. It's slightly easier to recover by standing up a new subordinate CA or issuing revocations, but it's not a position you want to put yourself in. The following are some best practices for hardening.
- Install the latest Servicing Stack Updates and Cumulative Updates
- Remove SMBv1, PowerShell v2, .NET 3.5, which are often built into older Server Operating Systems
- Enable the Windows Screen Saver and set the timeout to 60 seconds
- Set the server time zone properly and ensure the time is correct
None of these are really necessary in a lab environment, but should be considered when standing up a production instance of a Certificate Authority.
If you're enabling a firewall either on the server or between this server and the clients, you'll need to allow the following inbound:
- HTTP (Accessing the CRT and CRL files) and HTTPS (Certificate Enrollment Server)
- DCOM/RPC (Certificate Requests)
After rebooting, we're good to continue.
Installing the Certificate Authority Role
Everything you need to setup your CA is included on the CD/ISO for Windows Server or is baked into the Operating System. To install the Certificate Authority Feature, you'll:
- Launch Server Manager
- Select Manage -> Add Roles and Features
- Follow the Wizard until you reach "Server Roles"
- Enable "Active Directory Certificate Services" and continue the wizard
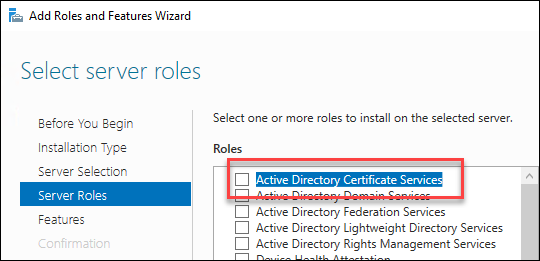
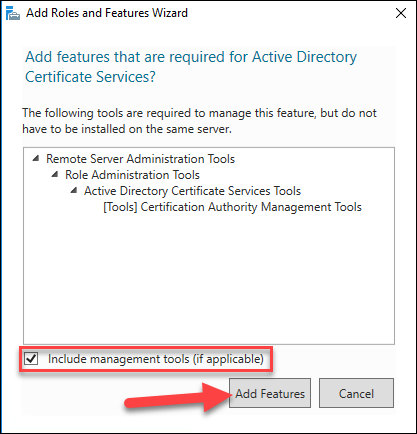
- Select to add the additional management features if prompted
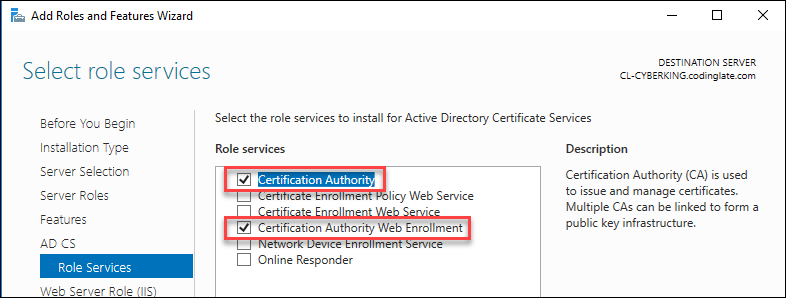
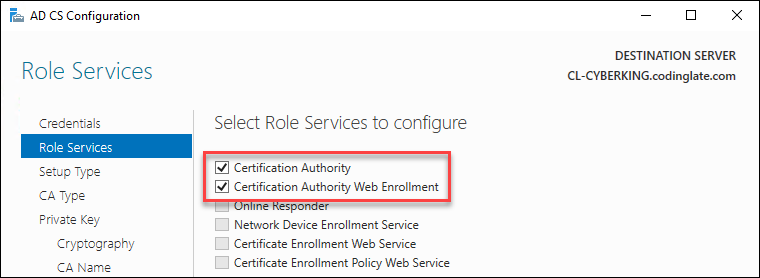
- When given a list of roles, you can click each one to see what they do. For this lab, we're going to install the Certificate Authority, and the Certificate Authority Web Enrollment.
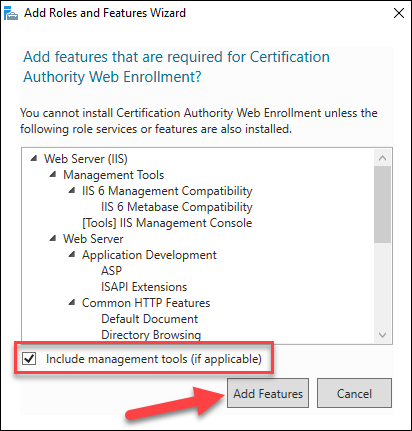
- Select to add the additional roles and management features if prompted
- Complete the wizard, accepting the defaults along the way until it's complete
Configuring the Certificate Authority
Once the installation completes, you should get a warning flag in Server Manager for AD CS Configuration. Select that flag and then click the "Configure Active Directory Certificate Services on the Destination Server" link.

Complete this wizard as follows:
Enter valid administrator credentials - the account must be an Enterprise Admin for your domain and a local admin on the server
Check to configure both "Certificate Authority" and "Certificate Authority Web Enrollment" roles
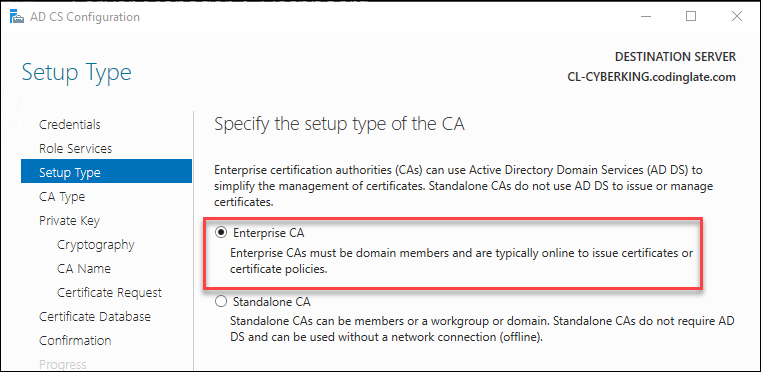
- Select that you want to configure this server as an Enterprise CA (if this isn't available, you've likely forgotten to use an Enterprise Admin account)
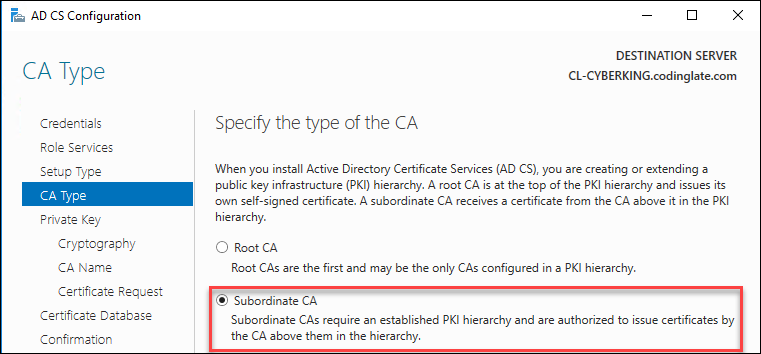
- Pick Subordinate CA (this CA will sit "underneath" your Root CA from the previous post)
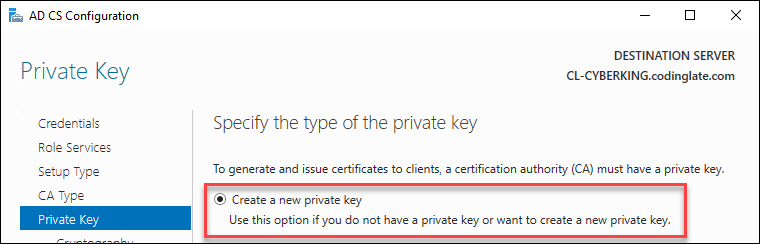
- Select to generate a new private key
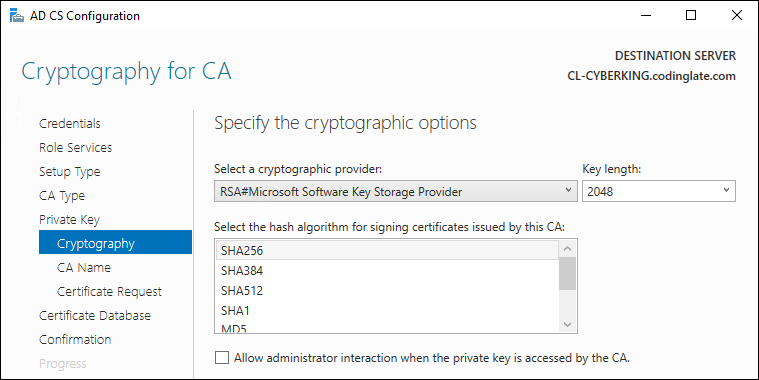
- Select your cryptography options (see Microsoft doc for more information)
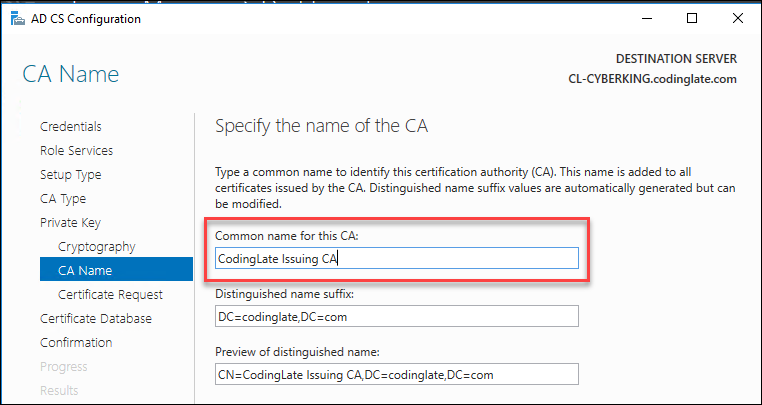
- Define your CA Name; for production, see the docs. The common name will default to the hostname of the CA, but there is no requirement to keep this value. For my lab, I'll change mine to something that makes sense for me.
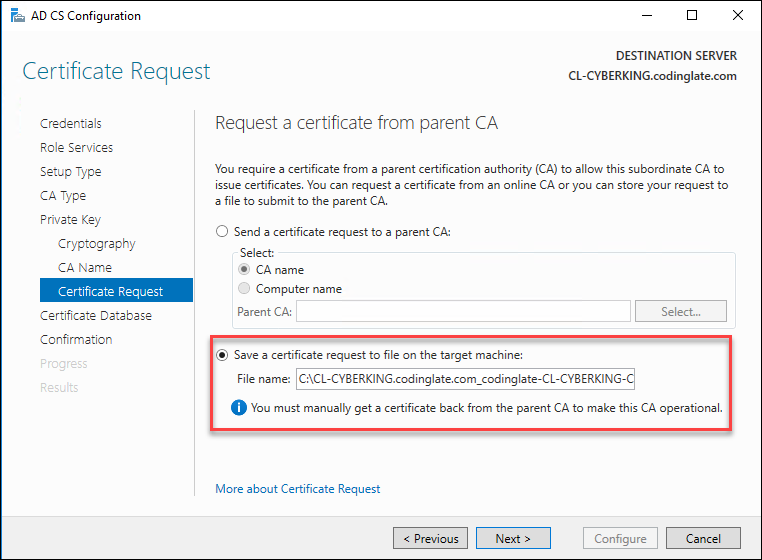
- Because your Root CA is unreachable on the network, choose to save the certificate request to a file
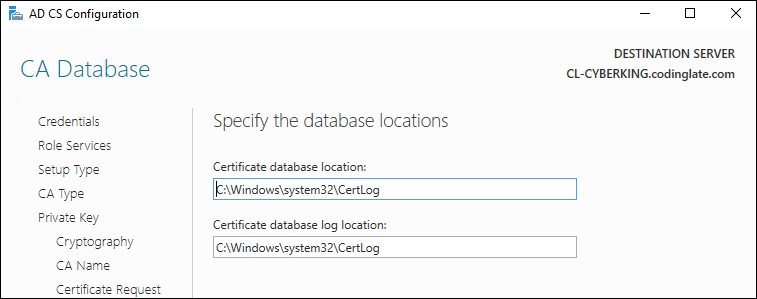
- Leave the database location as-is unless you have a specific need to change it
- Click Configure and you can safely ignore the warning that setup is incomplete
You now need to get the REQ file from this Intermediate CA to your Root CA. This is easily accomplished with physical hardware using a USB key or other removable storage, but if you're using Hyper-V, like we are in this lab, you have a few options, they just take a bit more work:
- You could use a virtual floppy disk (Generation 1 VMs Only)
- You could move VHDX files between VMs (Ugly, but works)
- You could use a Shared VHDX (If your environment supports it)
- You could use Hyper-V Enhanced Sessions to Copy & Paste (I wouldn't enable this in Prod)
- You could use a physical USB stick and mount/unmount as needed
Since this is just a lab and I'm not worried about any vulnerabilities with Hyper-V enhanced sessions, this is what I'll use to copy the files around. First, I'll enable Enhanced Sessions under the View Menu in my VM session, and then under the VM settings I'll make sure that Guest Services are enabled under the Integration panel.
However you decide to do it, get the REQ file from your intermediate CA on to your Root CA and then continue.
Obtaining the Subordinate CA Certificate
We don't have a certificate yet for our subordinate CA because the Root CA hasn't created it. What we have instead is a request for a certificate that we need our root to fulfill.
Before we request our certificate, we'll want to make a change to how long our CRLs from the Root CA are valid for. By default, this is a week. However, since our Root CA has no way to publish the CRL anywhere and this needs to be a manual effort on the administrators part (discussed later in this series), a week is a bit short. There is no shortage of opinions when you look online as to what this should be set to - you'll find everything from 3 to 12 months in most posts, and even many suggesting you set it out as far as the certificate will be around (20 years in this lab). How you configure your production environment is up to you, but for this lab we're going to use 6 months.
In an administrator command prompt on your Root CA, execute these commands:
1certutil -setreg CA\CRLPeriodUnits 6
2certutil -setreg CA\CRLPeriod "Months"
Next, we also want to ensure that our Subordinate CA's certificate doesn't expire yearly, which is the default. Remember, no CA can issue certificates for beyond its own expiration, so if we use a year, then nine months from now it won't be able to issue certificates with validity periods longer than three months. We're going to use half of the life of the Root CA in our lab, which is ten years.
In an administrator command prompt on your Root CA, execute these commands:
1certutil -setreg CA\ValidityPeriodUnits 10
2certutil -setreg CA\ValidityPeriod "Years"
Finally, we'll want to restart the Certificate Services Windows service.
1net stop certsvc
2net start certsvc
You're now ready to get a certificate for your subordinate CA.
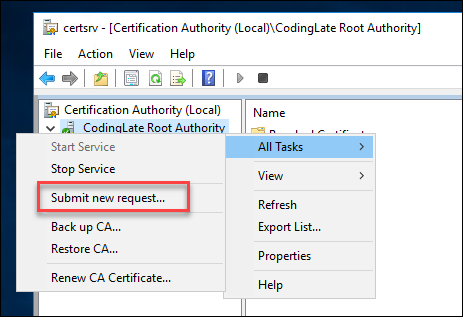
Complete the following steps on your Root CA:
- Launch "Certification Authority" underneath your Windows Administrative Tools on the Start Menu
- Right click on the name of your CA and select All Tasks and then Submit New Request
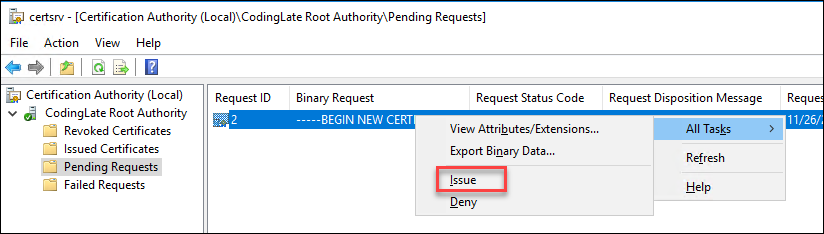
Select the REQ file that you copied in the previous step, there will be no message that the request has been submitted
Go to the Pending Requests folder, right click on the request, and select Issue, the request should disappear
- Go to the Issued Certificates folder, right click on the certificate, and select open - this is the certificate for your subordinate/intermediate CA
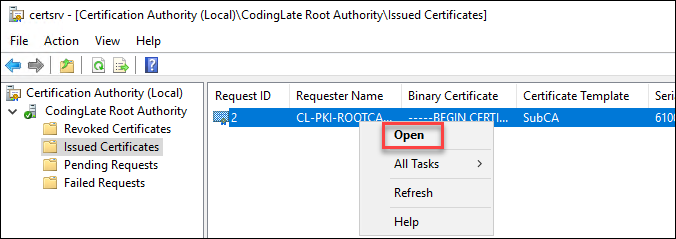
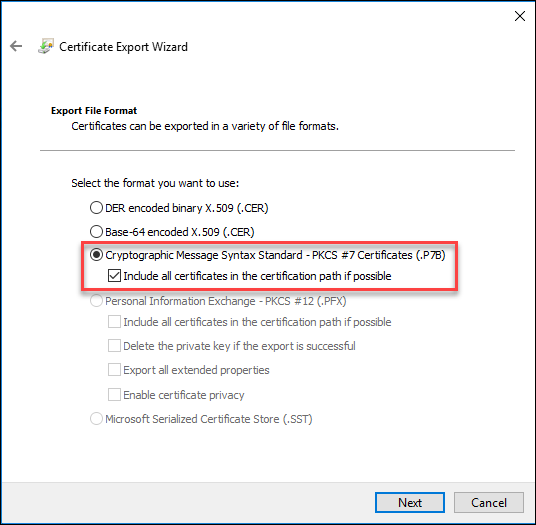
- From the details tab, select Copy to File
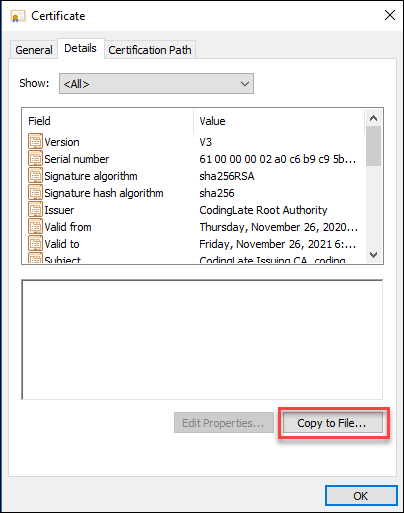
- Walk through the wizard to export the certificate at a P7B with all certificates in the certificate path
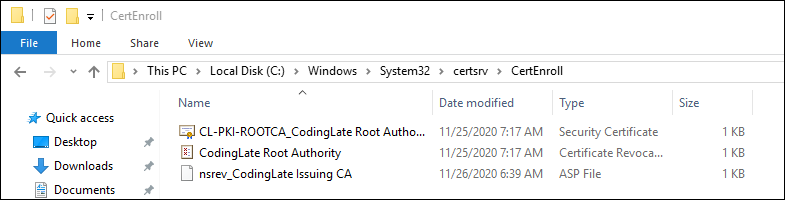
There are now three files we're going to need to copy. The first is the exported P7B from the wizard you just completed. The other two files are the Root CA certificate and the Root CA Certificate Revocation List (CRL), and they are both in C:\WINDOWS\SYSTEM32\CERTSRV\CERTENROLL (by default). Using whatever method works for you, get these three files back over the subordinate CA. The REQ (Request) file that you used to generate the certificate is no longer required and can be safely deleted.
You can now power down your Root CA - you won't need it again for a while
Installing the Subordinate CA Certificate
First, we're going to need to take the CRT and CRL files that we configured in Part 1 of this series and copied above. If you're following along, we said these would be available in the CertEnroll folder of the intermediate server webserver. When we installed the Web Enrollment feature, the installation automatically created an IIS mapped folder for us at C:\Windows\system32\CertSrv\CertEnroll that you can copy the files into. When you're all done, it'll look something like this:
Next we need to install the new CA Certificate like so:
- Launch "Certification Authority" underneath your Windows Administrative Tools on the Start Menu
- Right click on the name of your CA, select All Tasks, and then Install CA Certificate.
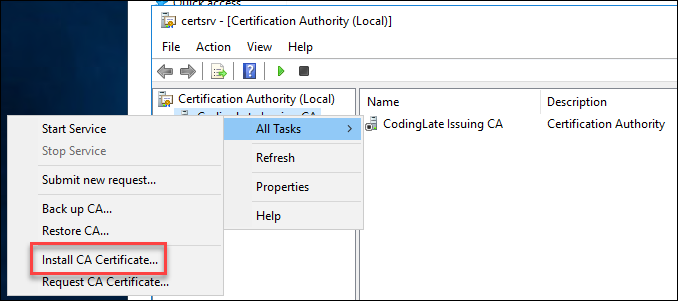
- Select the P7B file that you copied from your Root CA
Are you getting this error? You've missed the step on ensuring "Include in the CDP extension of issued certificates" is checked from Part 1 of this series. Go back, enable that, and then start the request process again (beginning from "Complete the following steps on your Root CA" a few paragraphs above this notice).
0x80092012 (-2146885614) CRYPT_E_NO_REVOCATION_CHECK

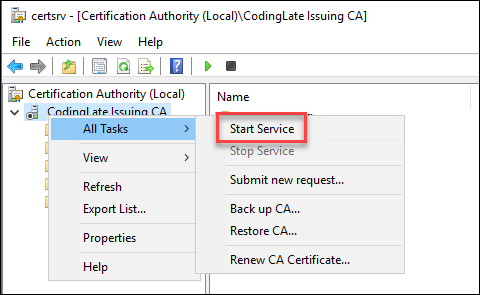
- If all went well, you can now start the CA by right clicking on it, clicking All Tasks, and then Start Service.
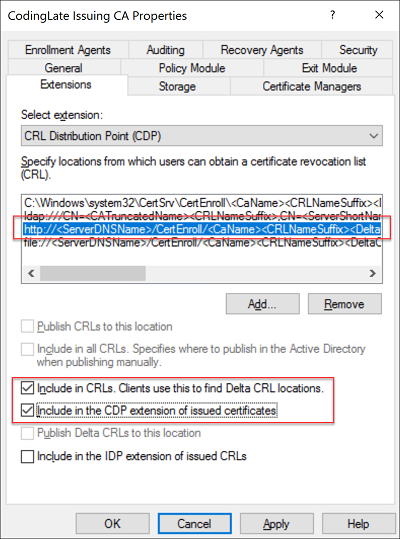
Defining the Certificate Revocation List (CRL) and Authority Information Access (AIA) Paths
Unlike our Root CA, this server will always be online. If you need to change where these will be for your clients, you'll want to configure that now before any certificates are issued. As a refresher, you'll find this under the properties of your Certificate Authority on the extensions tab.
By default, your certificate authority will be configured as follows:
- Publish the CRL to the Windows CertEnroll folder
- Publish the CRL to Active Directory (LDAP) and include this path in the certificate
I'm going to add HTTP to this list by checking in the two options shown in the image below.
That's it! Your intermediate server is now up and running and 99% of the way there to issue certificates.
Next: Part 3 - Catch up on what we've done and how it works
No comments