Standing Up a Microsoft Certificate Authority - Part 3
This post is one in a series about setting up a Microsoft Certificate Authority. It's broken down into the following parts.
- Part 1 - Standing up your Root CA
- Part 2 - Standing up your Subordinate/Issuing CA
- Part 3 - Catch up on what we've done and how it works (You Are Here)
- Part 4 - Trusting your Root CA across the domain
- Part 5 - Setting up Certificate Templates
- Part 6 - Using Computer, Web Server, and Code Signing Certificates
- Part 7 - Using the Certificate Enrollment Web Interface
- Part 8 - Maintenance and your day to day work
- Part 9 - So you want to learn more?
This is an introduction to CAs only, and I’ll admit that all of my knowledge is from working with consultants to stand environments up and from reading Microsoft’s documentation. Make sure you do your own research to properly secure your CA and stand it up in a way that works best for your environment. A personal shout out again to my technical editor for this series, Anthony Fontanez.
In this post, I'd like to tie together everything we've done so far. If you're following along, you've probably gotten through standing up two servers in a lab environment in under 30 minutes, but perhaps without understanding the implications of the changes you've made along the way. We're not going to make any changes to your environment in this part of the series, so you're welcome to skip it and you'll still end up with a perfectly valid environment, but I feel like there might be some value here for you.
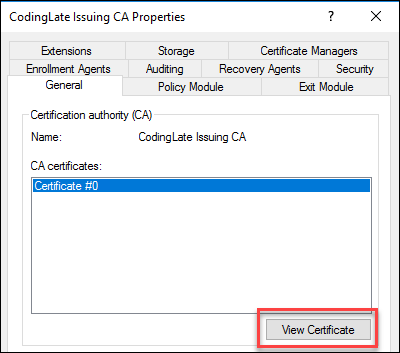
Primarily I'd like to take a look at the two certificates and the two CRLs that you now have live in your environment or in your lab. On your subordinate CA, that we stood up in Part 2 of this series, launch Certificate Authority from your start menu. Right click on the name of your CA, and select properties. From the General tab, select "View Certificate".
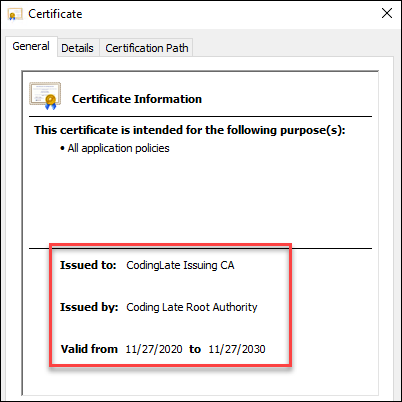
If you've ever looked at a certificate on your system or in your browser before, this window looks pretty familiar. From the details page you can see who the certificate is issued to (the name you created in Part 2 of this series), and then who it was issued by (the name you created in Part 1 of this series). If you're following along with the same dates I'm using in this lab, you'll notice it's valid for ten years.
Next, let's head over to the Details tab. There are some specific details about this certificate that I'd like to point out:
- Issuer, Valid From, and Valid To will map to what you've seen on the General tab
- CRL distribution points should match what you entered on your Root CA, and you should be able to browse to that URL
- Authority Information Access should also match what you entered on your Root CA, and you should be able to browse to that URL
If you look at your Certification Path, you should see that you have a two tiered chain where the Root is right at the top, with this certificate under it. If you were to look at the details of the Root CA, you'd see many of the same details but notably missing would be the CRL and AIA. This is because it's the root - there is no one "above" it in the chain to tell if you that the certificate is no longer valid by revoking it. This is the primarily reason that it's so important to keep your Root CA secured.
Considering the CRL again, grab that path from your issuing certificate and open it in a browser. If you're launching it from the server, you may need to disable IE Enhanced Mode or make the site a trusted one. For this lab, the URL was http://cl-cyberking/CertEnroll/Coding%20Late%20Root%20Authority.crl. When you open the file, you'll see something like this:
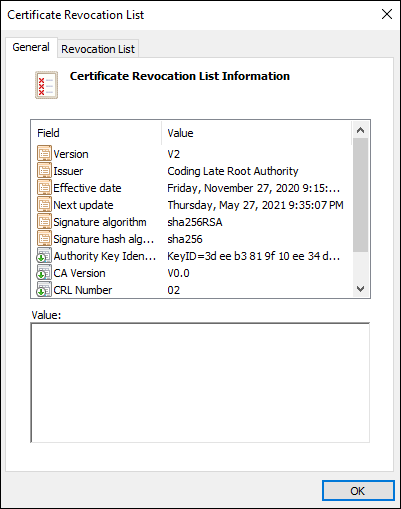
Remember we said earlier that the Certificate Revocation List (CRL) contains a list of all certificates that have been revoked (not expired)? This is that list. If you take a quick look at the second tab, you'll likely see the list is empty since we haven't revoked any certificates yet from our Root CA. What's important on the first tab, however, is that like a certificate, your CRL has a date when it's expected to be updated by ("Next Update"). Your Root CA can never update the URL that you've downloaded this from, which is why we had to copy it into the CertEnroll folder (Part 2 of this series), and why you'll need to do the same thing every so often before the "Next update" date passes. If you're using the same dates we have been, that's every six months.
Important to note, however, is that this is only for certificates issued by your Root CA, of which you'll only have one. Your subordinate CA, created in Part 2, is online and can update its own CRL when you revoke certificates.
To really drive these points home, let's take a look at C:\Windows\System32\CertSrv\CertEnroll on your Subordinate CA. It'll look something like this:
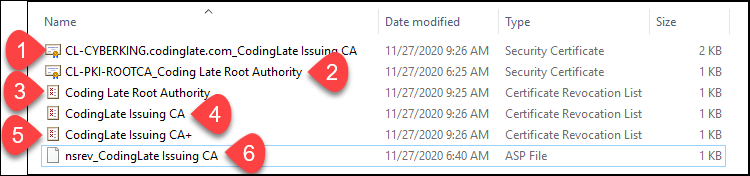
As we touched on in Part 2 of the series, this folder is exposed to your network using IIS as http://yourservername/CertEnroll so that all of the clients can access it.
| # | What is it? | Where did it come from? | How does it get updated? |
|---|---|---|---|
| 1 | The CRT (public certificate) for the subordinate CA | It was placed here automatically when you stood up the subordinate CA | Automatically any time you request a new certificate for your subordinate CA (every 10 years in this lab) |
| 2 | The CRT (public certificate) for the Root CA | You copied it here in Part 2 of the series | Manually again when you generate a new Root CA (every 20 years in this lab) |
| 3 | The CRL from the Root CA | You copied it here in Part 2 of the series | Manually again before the next renewal date (every 6 months in this lab) |
| 4 | The CRL from the subordinate CA | It was automatically put here where you stood up the subordinate CA | This will be updated weekly automatically by your subordinate CA |
| 5 | The delta CRL from the subordinate CA | It was automatically put here where you stood up the subordinate CA | This will be updated daily automatically by your subordinate CA |
| 6 | An ASP file used for Netscape iPlant's certificate revocation | It was automatically put here where you stood up the subordinate CA | This is a static file that will likely never change outside of an OS upgrade or patch |
Next: Part 4 - Trusting your Root CA across the domain
No comments