Standing Up a Microsoft Certificate Authority - Part 5
This post is one in a series about setting up a Microsoft Certificate Authority. It's broken down into the following parts.
- Part 1 - Standing up your Root CA
- Part 2 - Standing up your Subordinate/Issuing CA
- Part 3 - Catch up on what we've done and how it works
- Part 4 - Trusting your Root CA across the domain
- Part 5 - Setting up Certificate Templates (You Are Here)
- Part 6 - Using Computer, Web Server, and Code Signing Certificates
- Part 7 - Using the Certificate Enrollment Web Interface
- Part 8 - Maintenance and your day to day work
- Part 9 - So you want to learn more?
This is an introduction to CAs only, and I’ll admit that all of my knowledge is from working with consultants to stand environments up and from reading Microsoft’s documentation. Make sure you do your own research to properly secure your CA and stand it up in a way that works best for your environment. A personal shout out again to my technical editor for this series, Anthony Fontanez.
In this part of the series, we’re going to start getting ready to issue some certificates, and we’re going to do that by creating some Certificate Templates. This can be done from any workstation that has domain access and has the Certificate Templates console installed (part of the Remote Server Administration Tools), but we’re going to do it from our Intermediate Server in this lab since we know everything we need is already installed there from Part 2 of the series.
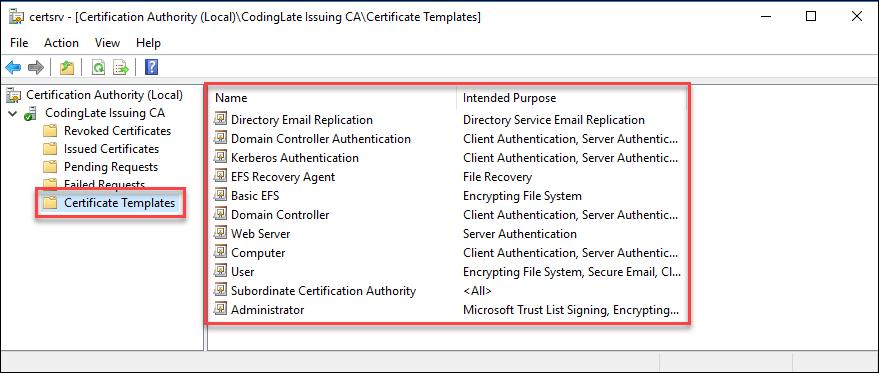
Let’s open up our Certification Authority again and head down to the Certificate Templates folder. You’ll likely notice it’s been pre-populated with a number of default templates as shown here.
In my lab, I’m going to delete all of these. I’m going to do this for two reasons. First, I don’t want my CA to issue any certificate that I haven’t explicitly put into this list after significant thought about how they’ll be configured, used, and managed. Second, I don’t want to modify the default templates, I want to leave them in their pristine out-of-the-box condition, and make copies of them for how I’ll use them in my environment. So, I’m going to select all and delete.
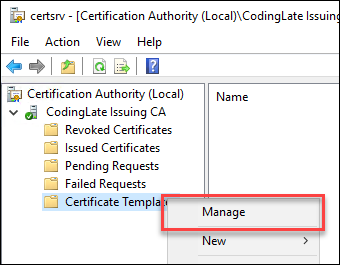
Next up, I’m going to open the Certificate Templates console by right clicking on the Certificate Templates folder and selecting Manage.
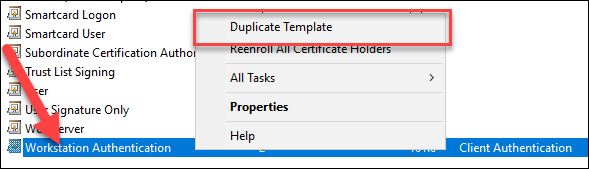
You may notice that you’re now connected to a Domain Controller and not looking at your local templates any longer. This list contains the templates for all of the certificate types in your domain. For this next step in the lab, we’re going to setup just three certificate templates. The first will be Workstation Authentication. This allows the computers on your network to identify themselves which often comes up when looking at VPN solutions, allowing anyone with a template from a specific root authority to connect without a username or password. This can also be used in Configuration Manager to identify yourself to the management points.
To create our template, we’re going to right click on Workstation Authentication in the list and select Duplicate Template.
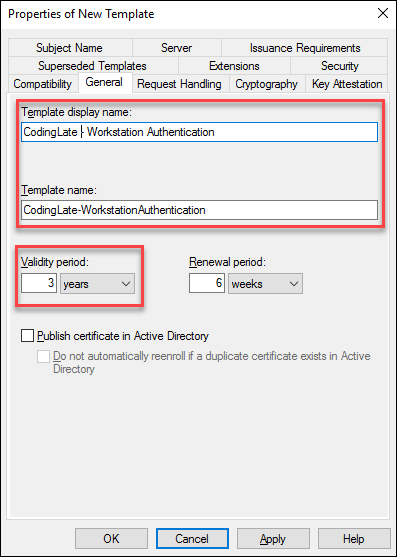
You can poke around the tabs to see the different things you can change, but we’ll leave most of the options as-is. What I will change is the validity period. In my fictitious lab, workstations are around for 3 years before they’re refreshed, and I don’t see a lot of value in renewing a certificate in less than that amount of time. So, I’ll head over to the General tab and change the validity period to 3 years. I’ll leave the renewal period at 6 weeks which should cause my workstations to try and renew the certificate somewhere around 6 weeks before they’re set to expire.
Next, while I’m here, I’ll change the name of the template. In order to keep them alphabetically grouped together as I create new templates, I’ll prefix my template names with something common; in this case, I’ll use CodingLate as it’s the name of my lab.
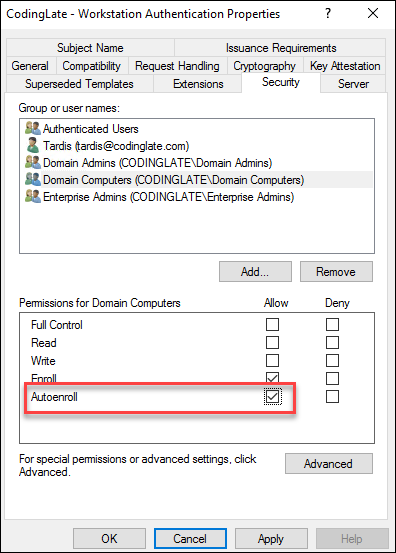
Before saving, I’ll head over to the Security tab, which dictates who can use this template. By default, Domain Computers can enroll (request) this type of certificate, but we’re going to also give them the Autoenroll permission. If targeted with a specific GPO (covered soon in this blog series), this will have all systems automatically request an install a Workstation Authentication certificate.
Finally, we’ll click OK and note that the new template is now listed. This template is stored on your domain and is not specific to your Certificate Authority. This security tab is how you control who can request certificates from your CA. Default permissions don’t allow most users or computers to access these duplicated templates, and best practice, I believe, would be to setup Active Directory groups specific to the templates to grant access as needed.
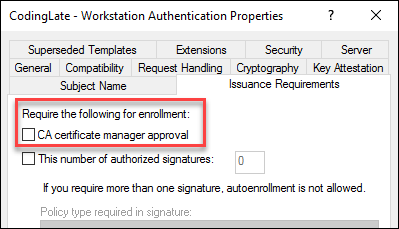
In additional to normal ACL security, you can also configure a template to require a CA Manager (that’s you!) to approve requests before they’re issued. This is setup on the Issuance Requirements tab of the template. We aren’t going to do this in our lab.
Next, we’ll follow similar steps for the Web Server template. We’re going to duplicate it, but this time we’ll change the Validity period to 1 year instead of the default of 2 years. We will not setup autoenrollment for this template.
Finally, let’s do the same for the Code Signing template, which we’ll duplicate and leave the validity period at the default of 1 year.
In the end, here is what we now have in our lab:

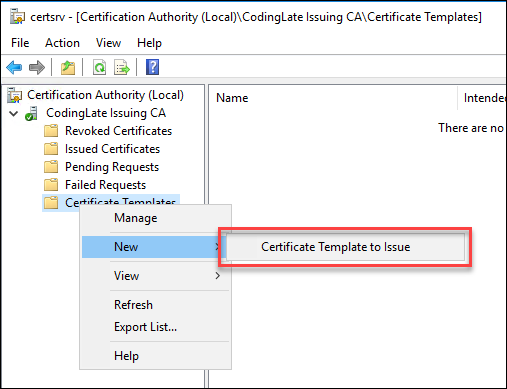
In order to make these templates available in our lab, we’ll close the Certificate Templates Console, right click on Certificate Templates back in our Certification Authority window, and click New -> Certificate Template to Issue.
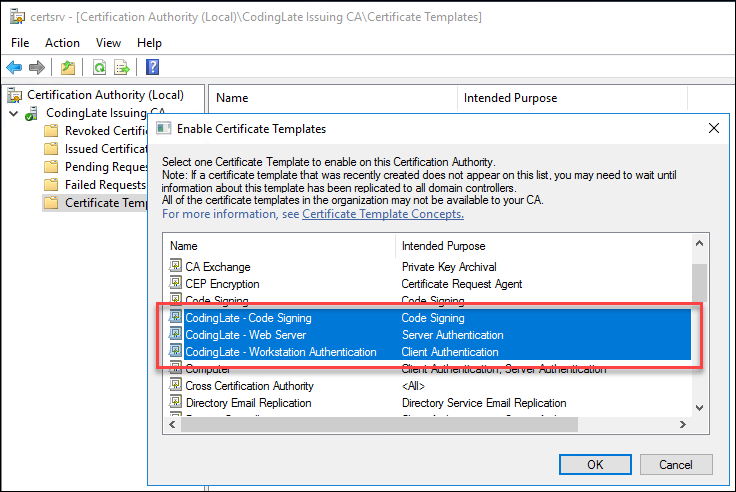
If the three templates you’ve created don’t show up immediately, that’s normal. Sometimes it takes a bit of time for your domain controllers to process what we’ve done. Give it a few minutes (sometimes up to 30!) and then come back and try again. If it’s still not showing up, check out this article to ensure something wonky didn’t happen when the enrollment service was created (it happened during one of my lab builds). If you need to make a change in ADSIEdit, restart the CertSrv service on your intermediate certificate authority and it should show up then.
Once they do show up in the list, select the three templates we created and click OK.
If you have made it this far, you’ve now done everything you need to issue certificates. Before I continue, I’m going to make two additional changes to the security of these certificate templates (like we did above) for later use:
- Grant computer SRV01 access to enroll in Web Server certificates
- Grant user Rose access to enroll in Code Signing certificates
In the next post in this series, we’ll start issuing those certs!
Next: Part 6 - Using Computer, Web Server, and Code Signing Certificates
No comments